


What is Inertia.js?
It is a package that enables you to build single-page applications without building an API. It allows you to build a monolith that behaves like a SPA!
It simply connects a server-side framework to a client-side framework. You get to keep all the good stuff you love from your server-side framework while still creating an SPA.
Inertia serves as a glue that holds your server-side framework and your client-side framework together. Pretty nifty, yeah?
Inertia does not try to take over your application. It does its thing and gets out of the way.
Let's get started already!
To install Inertia, we need to already have our server-side framework set up and ready to receive the installation. So let's quickly create a new Laravel application for this purpose. Navigate to the folder where you would like to keep your code and open your favourite terminal window there and run the following command
laravel new inertia-vue-demo
Install Composer on your device. Visit the composer website by clicking on the link below for a guide on how to do this for your device.
Composer: PHP's dependency manager
After you have installed Composer on your device, you can run the following command in your terminal to install the Laravel installer package:
composer global require laravel/installer
You can now run the first command to create the Laravel application.
We are now ready to install the inertia package in our Laravel project. Run the following command in your terminal, and make sure you have navigated into the project folder you created.
cd inertia-vue-demo && composer require inertiajs/inertia-laravel
This command will pull in the latest stable version of the inertia adapter for Laravel. You can simply copy this code snippet, paste it into your terminal window, and let Composer do its job.
The next step is to open the Laravel project in your favourite text editor window after the installation is done.
We will need to set up our root template so that our Vue (get it? ) can be rendered for the front end. In your text editor window, open the resources directory, then the view directory, and inside of the views directory, create an app.blade.php file and paste the following code inside the file.
<!DOCTYPE html>
<html lang="en">
  <head>
    <meta charset="utf-8" />
    <meta name="viewport" content="width=device-width, initial-scale=1.0, maximum-scale=1.0" />
    @vite('resources/js/app.js')
    @inertiaHead
  </head>
  <body>
    @inertia
  </body>
</html>
The next thing we will need to do is set up the Inertia middleware. This middleware is the actual MVP of our application, it tells Laravel how to set up the response for inertia.
Paste the following command in your terminal window and run it to generate the middleware
php artisan inertia:middleware
Once you have generated the middleware, go to your Kernel.php file, which you will find inside the Http folder, which in turn is in the app directory, and add the following as the end of the web array in the protectedMiddleware group array:
'web' => [
    //...
    \App\Http\Middleware\HandleInertiaRequests::class,
],
Yay! 🎉
You have now set up the server side of your inertia application. Now onto the client side!
Since we will be using Vue 3 for the client side of this application, we will set up our application to read our Vue files.
Inertia out of the box provides support for React, Vue and Svelte. So we will install the dependencies for Vue 3 with this command:
npm install @inertiajs/vue3 vue@latest
This command will install the necessary dependencies for inertia and Vue 3 for us. From here, we will move on to configure our application to use Vue 3 and tie it to our inertia layer.
Open the app.js file you'll find in the js folder which you will find in the resources directory of your project and paste the following code:
import { createApp, h } from 'vue'
import { createInertiaApp } from '@inertiajs/vue3'

createInertiaApp({
  resolve: name => {
    const pages = import.meta.glob('./Pages/**/*.vue', { eager: true })
    return pages[`./Pages/${name}.vue`]
  },
  setup({ el, App, props, plugin }) {
    createApp({ render: () => h(App, props) })
      .use(plugin)
      .mount(el)
  },
})
In this code, we are telling Vue to look in our Pages directory in the same js directory to find the Vue files it will load, so we need to create the directory our Vue files will be in.
In your JS directory, create a new directory whose name is Pages.
The final step is to compile the whole thing. At the time of this post, Laravel 10 is the latest version of the framework, and that is what the Laravel installer will pull in for us. Vite is the bundler being used for the assets, so we need to enable Vue support in our Vite configuration file before we can run our compile command.
Run the following command to install the plugin that will help Vite understand our Vue files:
npm i @vitejs/plugin-vue
Then add the plugin to your Vite config, which you will find at the root of your project.
import { defineConfig } from 'vite';
import laravel from 'laravel-vite-plugin';
import vue from '@vitejs/plugin-vue';

export default defineConfig({
    plugins: [
        vue(),
        laravel({
            input: ['resources/css/app.css', 'resources/js/app.js'],
            refresh: true,
        }),
    ],
});
Phew! This has been such a ride. Well, hang on, we are almost done.
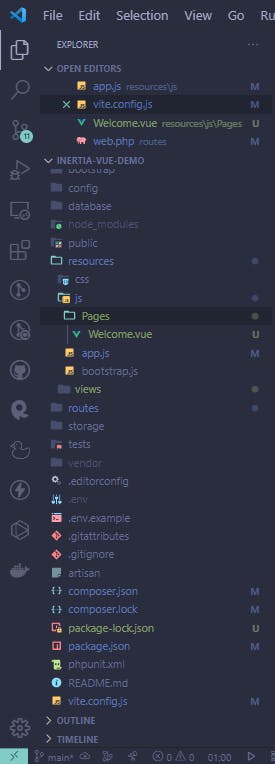
Let us create a new vue file in our pages directory to test our set-up
Go to your pages directory and create a Welcome.Vue file.
Your file should look like the one in the picture below
After creating the file, we will add some text to it so we can see the file in the browser when we start our application
<template>
    <h1>Welcome to my inertia app</h1>
</template>
Next, we will edit our web.php file which can be found in the routes directory and we will change the get route there to look like this:
Route::get('/', function(){
    return inertia('Welcome');
});
We are ready to compile everything!🎉🎉
Open another terminal window, navigate to your project folder and paste the following code:
php artisan serve
In the other terminal window, paste the following command:
npm run dev
In your browser, visit localhost:8000 and your webpage should look like this:
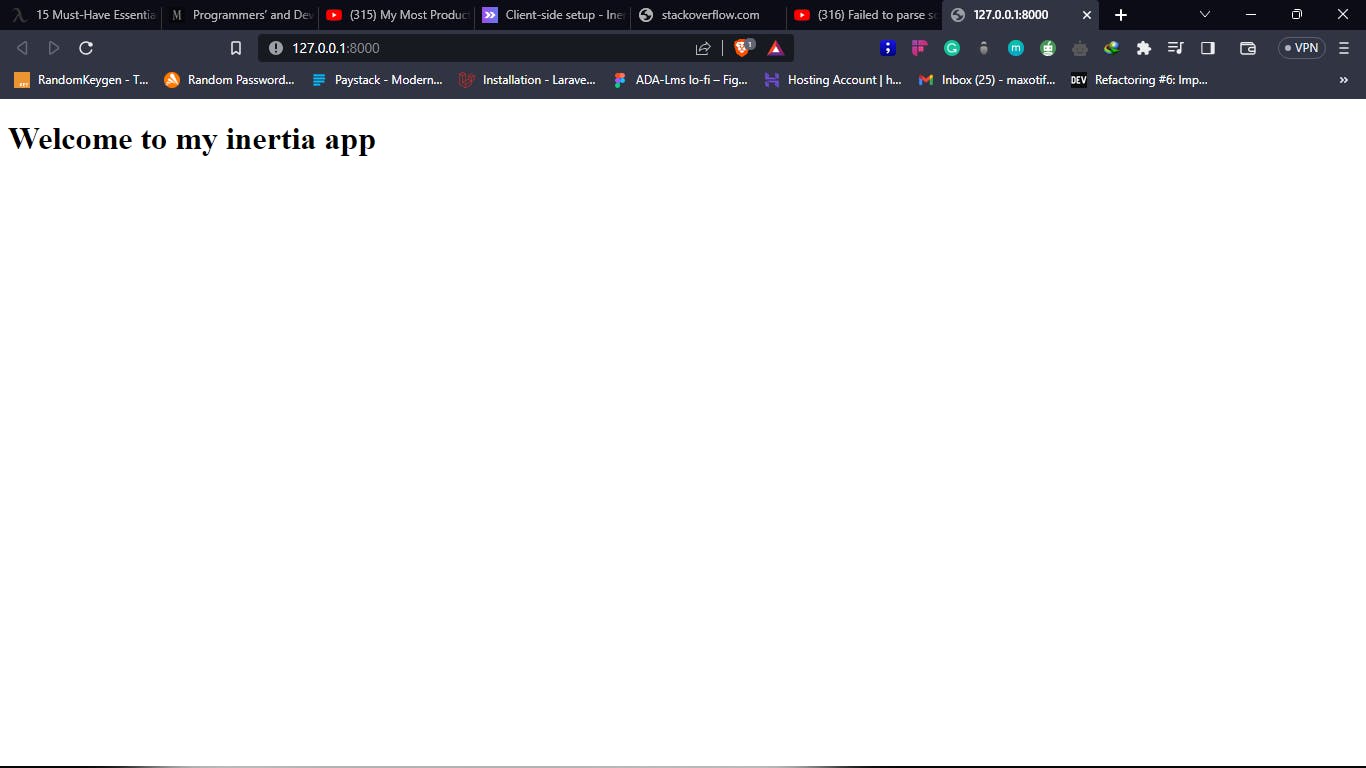
Voila! You did it!🎉
That's it for now, in the next post, we will continue with our demo application and build something interesting.
Bye for now.